Reformat External HDD without Losing Anything Inside
Summary
Use 4Card Recovery to restore your reserved Word files, photos, mails, texts, videos and audios back from external hard disk that says it needs to be reformatted on your computer or laptop.
External HDD Data Recovery by 4Card Recovery
Free download 4Card Recovery to take your desired drive information back before you start to do a fresh reformat on this USB hard disk.
Computer Windows Says Your External HDD Needs to Be Reformatted?
Want to do a fresh reformat on your external hard drive before reinstalling or updating your Windows operating system? Attempt to reformat USB hard disk drive for fixing drive problems when it is running into some unfamiliar troublesome issues? Or already formatted external HDD just weirdly says it needs to be reformatted before any use? But, you still hesitate since you cannot imprudently reformat this portable hard drive to erase everything inside? Look for a better solution to reformat this drive without losing anything left? OK! Don’t worry! As you wish, there is another way for you to rescue your drive information as well as reformatting this drive smoothly. Just learn to take your wanted USB hard disk files, images, mails, texts and more back by following the below data recovery tutorial at the first place and then, perform your desired reformatting process on that portable hard disk easily. .
Rescue Your Left Drive Files before Doing Any Reformatting Process
No matter why you’ve formatted this external hard drive at the first time, this time, without rescuing your very important drive files back, you’d better not blindly formatted this drive again. This formatting process could put your drive information in danger again. Just keep this external hard drive away from anything new or dangerous and try to take your desired previous stuffs with external hard drive data recovery software like 4Card Recovery, which allows you to do a thorough scan on this drive and rescue all possible previous drive files, images, audios, songs and more back.
Here is the external HDD data recovery tutorial for you:
Step 1:
Insert this USB drive to your computer and download this data recovery software to computer partition. And then, click a file type to start the drive data recovery process after installing this software well.
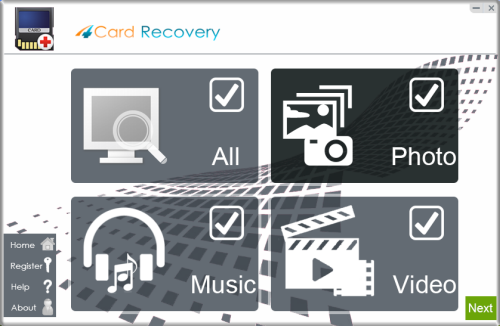
Select recovery options in the main interface
Step 2:
Choose your inserted USB drive from the media list and scan this drive by clicking "Next".
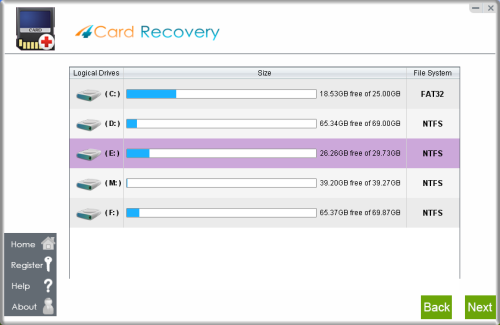
Select card to search photos off card
Step 3:
Preview and confirm all listed found drive information to choose the recoverable ones out.
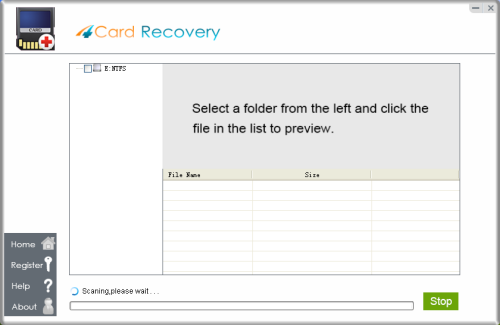
Wait while scanning lost photos, sometimes it takes about 20 minutes to scan a 32G card.
Tips: if it takes more than 2 hours to scan a 32GB card, you may stop the scanning and wait to see
what's already found. Since the card may contains bad blocks that takes longer time than usual.
Step 4:
Click another storage device from the drop-down menu to save all restored drive information.
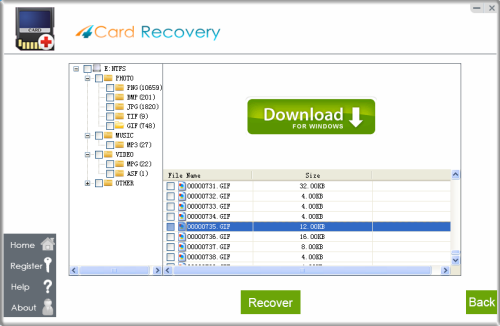
Preview lost photos and save found files. It would generate a folder to contain your lost data.
Please do not save the photo to the card where you lost them. Save them to your PC drive!
Useful Tips of Data Recovery:
* No matter whether this drive is reformatted, add nothings new on this external drive before taking everything back.
* No matter how many storage devices you’ve used on this computer, always choose a different drive or partition to hold all restored drive stuffs well.
* No mater how much data you’ve rescued back from that USB hard disk, just learn to save at least two copies of everything important on different drives or locations.
Save Restored USB Drive Information Well
The restored external hard drive photos, files, texts, songs and the likes also could be lost again when you do something improper to them, like saving them all on the original external HDD or accidentally do some damages to the same external drive. So, save your restored drive information on multiple drives or locations well immediately. The drive data backups could be really helpful when you lose them all again in the near future.
Test Whether External Drive Is Still Workable
No matter why you have to reformat this portable USB hard disk, to use it as before, you'd better firstly reformat this drive to go on. The reformatting process restores the functional use of this external drive? Just in case of any unexpected drive error, also test this drive with your Windows tools or other diagnostic tools to see whether it is still in good state. If it is not healthy any longer, you'd better never place your pretty important information there again.
4CardRecovery Awards
Hot Searches
More Related Articles You May Like
- data recovery from failing external hdd - restore data from external hard disk that is failing to read...Read more >>
- usb hard disk raw file system - data recovery when external hard disk has raw drive and inaccessible...Read more >>
- mistakenly delete files from external hdd - undelete file off external hard disk when deleted by mistake...Read more >>
- unformat external hard drive - retrieving files off external hard disk drive after foramtting accidentally...Read more >>
- external hdd erased data recovery - data recovery from external hard disk after erasing or deleting...Read more >>
- external hard disknot recognized - recover data from external hard disk that is not detected by pc...Read more >>
- data recovery after format raw external hdd - data recovery when external hard disk turns to raw...Read more >>
- external hard drive raw file system - data recovery from raw external hard disk drive with software...Read more >>
- restore data off raw usb drive - raw flash drive file recovery by using professional data reocvery tool...Read more >>
- unformat external hard disk - download unformat tool to restore files off formatted external hdd...Read more >>


